deneme bonusu veren siteler
deneme bonusu veren siteler
deneme bonusu veren siteler
deneme bonusu veren siteler
deneme bonusu veren siteler
deneme bonusu veren siteler
deneme bonusu veren siteler
deneme bonusu veren siteler
deneme bonusu veren siteler
deneme bonusu veren siteler
deneme bonusu veren siteler
deneme bonusu veren siteler
deneme bonusu veren siteler
deneme bonusu veren siteler
deneme bonusu veren siteler
deneme bonusu veren siteler
deneme bonusu veren siteler
deneme bonusu veren siteler
deneme bonusu veren siteler
deneme bonusu veren siteler
Bolts / Anchors / Mechanically Fasten
Bolts / Anchors / Mechanically Fastened
Product Info:
 |
|
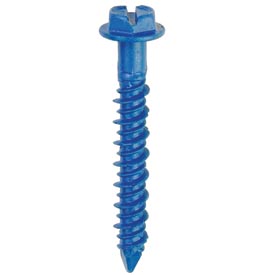
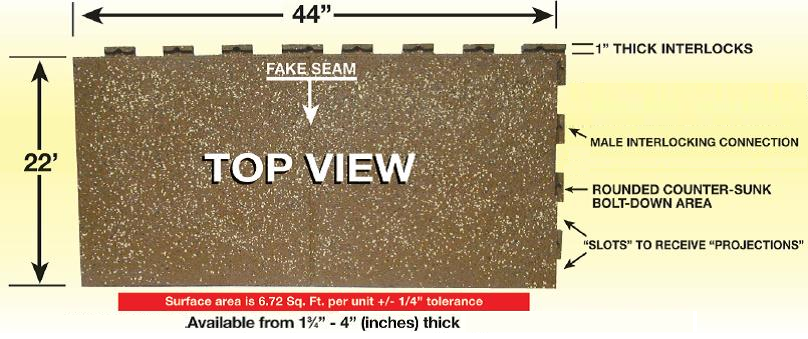
The patented "Bolt-down" mechanism is strategically designed to go through Unity’s patented male portion of the interlocks joints, providing unmatched performance that cuts and threads into concrete (cement), brick, asphalt (blacktop) or any standard sub-flooring materials, providing excellent holding values.
With billions of these anchor bolts in use across the globe, it is the professional’s choice for quality, strength and ease of installation. The corrosion resistant coating makes our bolt-down system a long-lasting solution capable of withstanding the harshest conditions, and is “Building Code Approved” for use indoors and out. The one-piece design of the anchor-bolts requires no assembly for quick and easy installations, so you can move on to next tile being installed.
|
Features:
- Made in the U.S.A.
- Blue Climaseal® coating is uniquely applied in multiple stages through dip-spin technology for extra corrosion resistance.
- Advanced Threadform Technology™ intertwines a large “chiseled” main thread with a small diameter thread to reduce head snapping and provide:
- 30% lower installation torque
- 20% more holding power
- Finished head gives a low, uniform profile and aesthetic appeal.
- Close-to-edge placement. No expansion or outward pressure allows installation near a concrete’s edge without cracking.
- Easily reversible and removable. No inserts required.
- Recommended for use Unity’s (ground level) rubberized safety surfacing, flooring and paver products, indoors and out.

WE DO NOT RECOMMEND THIS PRODUCT FOR ROOFTOP APPLICATIONS WHAT-SO-EVER. It is only meant or ground-level installations over a solid sub-base.
Unity’s patented “Bolt-down” system is found within the male portion of our interlocking joints to provide added strength, security and peace of mind when fighting vandalism issues that plague many inner-city applications. It is counter-sunk, and independently laboratory tested, to avoid any “hard-spots” within the product itself.

Up to twelve bolts can be used across various portions of the male interlocking joints to ensure that issues such as vandalism and/or severe weather, will not be tolerated by our anchored-down products. Such field testing was applied during several hurricanes that blasted through the states, where 6 feet of salt water and debris had buried our rubber tiles/mats/blocks on playground projects up and down the east coast for several days only to come up unscathed with no issues of up-lift, separation, curling and/or peeling what so ever. Said projects are below:
This product has also been tested in a salty spray environment for 720 hours with less than 10% red rust, per ASTM B117. The anchor-bolts have been tested in rigorous conditions to meet the Miami-Dade County standards (#07-0315.03, ICC-ES Evaluation Report ESR-1671, Florida's Building Code FL7556), giving you the highest level of protection and strength to withstand harsh weather (and vandalism) conditions.
Compatible Drill Bits:
- Easily find the right drill bit to install anchors by using the color-coded system labeled on all product packaging.
- A 3/16” diameter requires a 5/32” light-duty drill bit, while a 1/4” diameter requires a 3/16” medium-duty drill bit.
Drilling, Sliding and Driving Info:
|
Drill a hole at least 1/4” deeper than the anchor embedment using a hammer drill and the appropriate drill bit size. Make sure you drill through rubber tile first as your starting point, in order for the drilling of the solid sub-base to line up accordingly.
|
|
Slide the Condrive® Installation tool over the drill bit and snap in the drill adapter and snap into the chuck. Then place the hex or Phillips bit into the appropriate Condrive tool end. Position a 3/16” or 1/4” diameter anchor-bolt onto the end of the sleeve.
|
|
Drive the anchor-bolt into the pre-drilled pilot hole until it is fully seated. The torque-adjusted driver prevents over-torqueing of the anchor head by automatically disengaging when it comes into contact with the fixture surface.
|

|
|

|
|
 |
Product Specs:
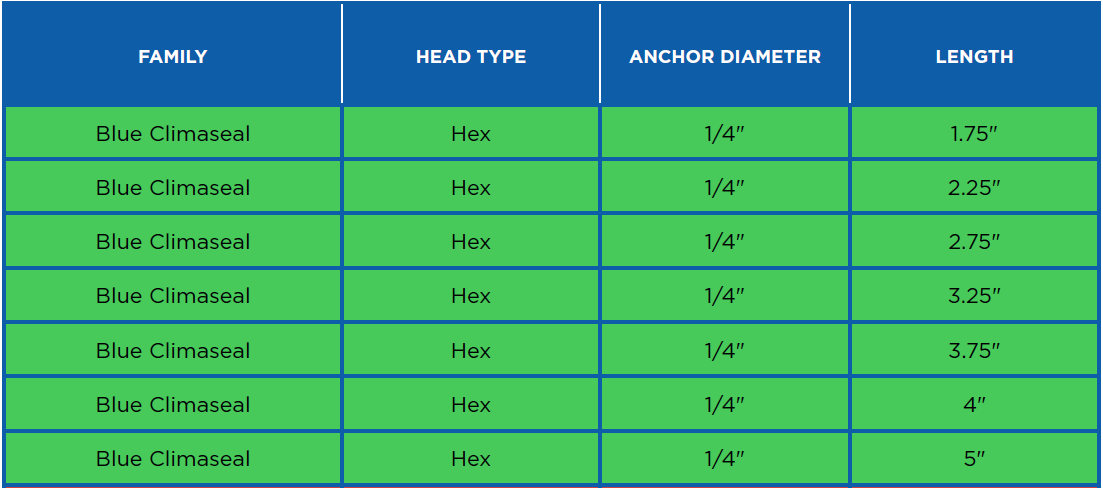
| Anchor-Bolt Information: |
|
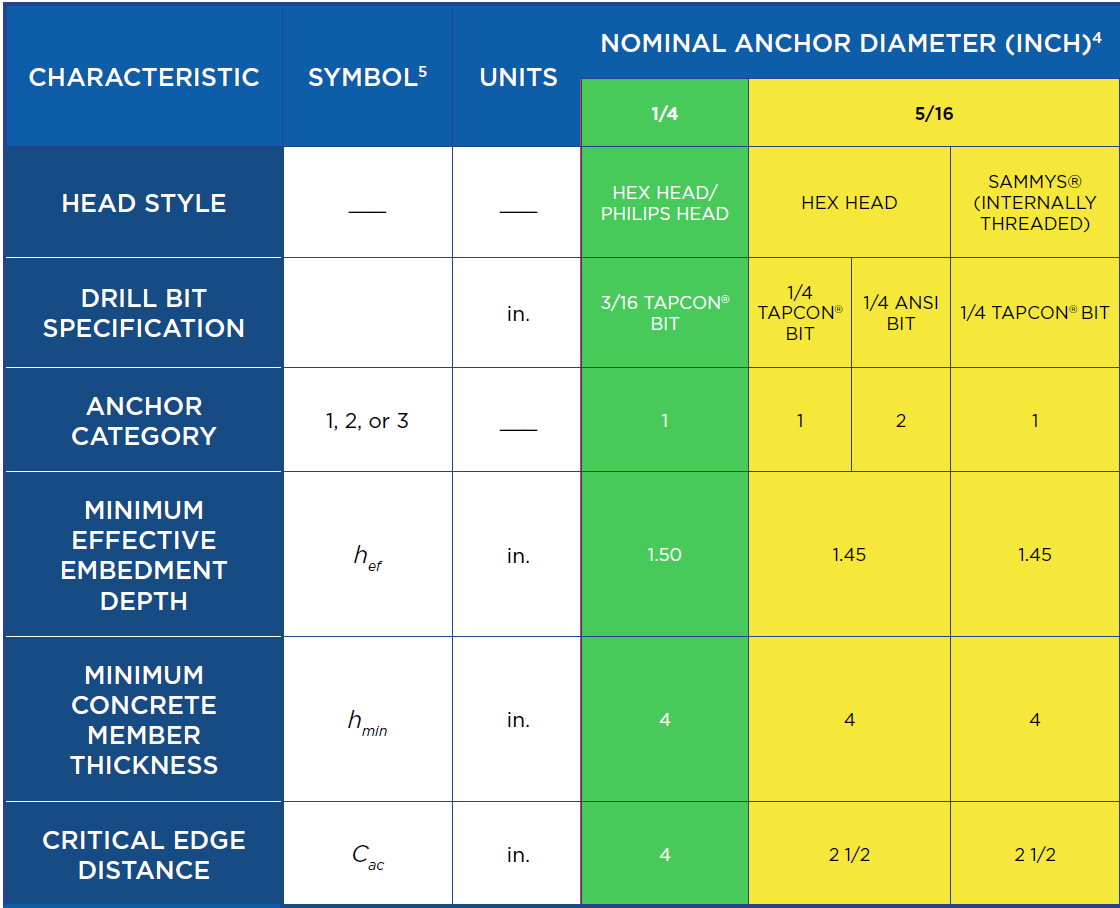
Tensile Strength Design Info: |
|

|
|

|
Stress Design Tension Values:

| Tension and Sheer Values Lbs (kN): |
|
Allowable Edge and Spacing Distances: |

|
|
 |
Click here it see a video on how the glue is applied to the interlocking joints, both inside the channel and along the top of the outside-edge of the same channel labeled: UNITY showing installation of glue at interlocks both inside the joint & on top.
Seller makes no warranty; express or implied, concerning the product furnished here-under other than it shall be of the quality and specifications stated herein. Any implied warranty or fitness for a particular purpose is expressly excluded and to the extent that it is contrary to the foregoing sentence, any implied warranty of merchantability is expressly excluded. Any recommendations made by Seller concerning uses or applications of said product are believed to be reliable and Seller makes no warranty of results to obtain. This data sheet supersedes all previous data sheets for this style and is subject to change without notice.